Pages

Sunday, July 29, 2012

Lemon-Lime Sugar Cookie Truffles


I've tried several different kinds of cake balls thus far, but I've never made them with a cookie mix. In fact, I've also never made them without using the Babycakes maker and the whole point of me getting that thing was because I thought it would be easier.  BUT, after making these truffles by hand, I am thinking I may opt for this method more often. Both ways have their pros and cons of course.

So I've never zested a lime or lemon ever in my life....and its generally something I've avoided because it sounded, well I'm not even sure what it sounded like but whenever I would see a recipe that involved zesting something, I'd ditch the entire recipe.  I've also never really considered lemon treats either. I'm not sure why.  Anyhow, I saw these amazing truffles over at Singforyoursupperblog and the yellow sprinkles lured me in. I decided I'd totally conquer the zesting and not to mention everyone here loves sugar cookies so this could easily be a win.  

What You Will Need:
  • 1 bag of store bought sugar cookie mix (or make your own)   
  • 1 1/2 blocks of cream cheese (12 ounces) - room temperature.
  • 2 bags of Wiltons Candy Melts - white chocolate  (or any other brand. I just prefer Wiltons)
  • Zest and juice of 1 lemon and 1 lime.
  • Yellow sprinkles
What You Should Do:
  • Pre-heat the oven to 350 degrees.  
  • Follow the directions on the bag of sugar cookies or recipe.
  • Add the lemon and lime zest and juice and mix mix mix.

I zested and I liked it.
(click the pic )

  • Once everything is mixed well, spread the dough in a 9x9 baking dish that you've sprayed with some nonstick spray. Bake for 30-40 minutes.
  • Cool completely. Meanwhile, go ahead and set the cream cheese out on the counter. By the time the cookie bake is cooled, the cream cheese will be room temp.
  • Once totally cooled, remove from the dish and crumble it all into a medium mixing bowl.
  • Add the cream cheese and mix with a fork until everything is blended together.  It'll seem like its not blending at first.. keep going, it will work.  Taste test... omg I'm in heaven.
  • Now roll balls a little smaller than a golf ball and put in the fridge for about an hour.  I was able to get around 35 balls from the mix.

  • When the balls are chilled, remove from the fridge and then melt the white chocolate per instructions on the package.
  • Slowly dip each ball into the chocolate and coat the entire thing. A couple of toothpicks will help get the job done and are useful for getting them out of the chocolate.
  • Set on a cookie sheet lined with parchment paper and immediately top with sprinkles. The chocolate will set fairly quickly so you'll want to sprinkle right away
  • Place in the fridge until you're ready to eat them. 


NOTE: These are very sweet. I'd recommend not popping a whole one in your mouth and to have some milk or other drink handy. If you're anything like me, one will be plenty. If you are like the rest of my family, you'll be popping several in a sitting.

I also made a couple pink ones for my friend Wendy. I call these ones Pink Lemonade Truffles. ;)

Bacon and Corn Griddle Cakes


(Adapted from Recipe Girl)
Holy sweet bacon.  I stumbled upon this amazing recipe that is hands down my new favorite way of eating pancakes.  I'm really not much of a pancake fan (I prefer waffles) but I am now totally and completely sold on pancakes and I don't know that I could eat pancakes any other way after this.
These pancakes are filled with bacon and cheese and corn and are pure heaven. I even ate the leftovers cold as a snack and they were still awesome.


My first batch was a semi fail in that the batter was too runny.  The results were fine and edible, just thinner than I would have liked.  I also didn't follow the original recipe which was to make it from scratch, but rather I opted to use a box of pancake mix.  With my 2nd batch, I added an extra 1/2 cup or so of pancake mix which thickened it up perfectly.


Ingredients:
12 slices bacon, cut into 1/2-inch pieces
1/3 cup finely chopped sweet onion

4 stalks of scallions, sliced/chopped
Pancake mix - use the waffle directions (egg, oil, water)
1 large egg, beaten
1 tablespoon canola or vegetable oil
1 cup frozen, canned or fresh corn
1/2 cup shredded Monterey Jack cheese
Pepper

Maple syrup, for serving


Directions:

  • I used thick center cut bacon. Cut them into 1/2 inch pieces and cook them over medium head until they start to brown.  Throw in the onion and scallions and continue to cook until the bacon is crispy and the onions and scallions are soft.  
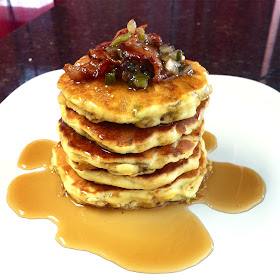
  • See the picture up at the top? Scoop out that much bacon and some of the onion/scallion mix - this is going to be your topping later, so set it aside. In fact, if you're going to make several stacks, scoop out enough so that everyone has some topping, and of course up the amount of bacon if 12 isn't enough.  The original recipe called for 8 slices. I upped this because 8 wasn't enough for me. I started with 8 and after pulling out the reserve bacon topping, I felt what was left wasn't enough for the batter, so I cooked up some more. 
  • While the bacon and onions are cooking, mix up your pancake mix in a medium bowl.  Remember to use the waffle method, which calls for water, oil, and an egg. I used Hungry Jack Complete Extra Light & Fluffy Pancake & Waffle Mix:  2 1/2 cups of mix, 1 1/4 cups of water, 1/4 cup of oil and 1 egg.
  • Stir in the rest of the bacon mixture, corn, and cheese. Your mixture should be thick. If not, add more pancake mix. If you'd prefer them thinner, add a little milk.
  • Heat the skillet and spray a little nonstick spray in the pan. Pour about 1/4 of a cup of the batter onto the pan and cook until its golden brown. Flip and repeat on the other side.  Repeat with the remaining batter.
  • Serve stacks with the reserve bacon/onion mix and some maple syrup to top it off.


Saturday, July 21, 2012

Homemade Lollipops


The main thing about this here is that its fun. If you want quality looking lollipops, you may want to go to the store, or perhaps you're a fancy superstar in the kitchen, unlike me.  But if you want fun and you want to entertain the kids or yourself, homemade lollipops kill at least 30 mins - 1hour and everyone walks away happy.  


What You Will  Need:
Jolly Ranchers or any hard candy - 1 bag.
Lollipop Sticks - I got mine at Michaels (don't get the plastic ones, they'll melt!)
Sprinkles - if you want...
Nonstick Spray
Parchment Paper
Aluminum Foil
Baking Sheet


What You Do:
Preheat the oven to 275 degrees.


Line the baking sheet with aluminum foil and then the parchment paper. Spray lightly with some nonstick spray and set aside.


Separate your candy colors and then you can go a few ways with this. Smash them, or don't smash them.  Or both. If you plan on smashing them, place the color set in a ziplock baggie and smash on a hard surface like a cutting board.


Now you can start making your patterns. You'll want to do this directly on the parchment paper.  You can use cookie cutters as your pattern makers, but I found this useless. The shapes didn't really stay put once the candy melted. 


Here are some of our smashed and unsmashed.


(click for a closeup)
Place your creations a bit apart so they have room to spread while they melt. You don't want them melting into each other.  


Put in the oven for approximately 7 mins or so. Keep an eye on them, you don't want to let them go too long.


Remove and immediately put your lollipop stick in. You'll want to kind of roll it once to coat it. 


Let them sit for a few so that the candy hardens.
While this is happening, you can add sprinkles even other candies if you'd like. 
Here are some of our creations!
(clearly I can't take a picture worth jack, but you get the idea)


Chocolate Chili Popcorn


Not a single picture I attempted to take of this recipe came close to showing just how awesome it actually tasted.  I promise you, if you like popcorn, chocolate and anything spicy, you will love this.
I'm not even that huge a fan of chocolate, minus the occasional craving or two, but I could not stop eating this - the combo was so absolutely delicious I want to make some more right now!!


What You'll Need:
Popcorn 
Chocolate
Sugar
Hot Sauce - your choice. I did some Bhut Jolokia and some crushed home grown Thai chili peppers.


Your Directions To Greatness:

 So initially, I opted to go with a bag of microwave popcorn. Either my microwave sucks, or the entire box of popcorn is bunk because I wasn't getting a full bag of popped popcorn. By the third bag in, I gave up and threw the kernels in a pot with some olive oil and was totally entertained watching it pop. I know this may be weird, but I have never popped popcorn this way. Ever. Pretty damn cool. 

While your popcorn is popping, you can begin working on the next step.  How much sugar, chili and chocolate you  use is up to you. For the chocolate, I used Wiltons Chocolate Candy Melts, about 1/2 the bag. You can use any chocolate really, like the little chocolate chips you bake in cookies.  Melt in the microwave at 30 second intervals and don't forget to stir. 


Mix your sugar and chili together until completely blended. Taste it... not spicy enough, add more. Too spicy, then you're SOL... I suppose add more sugar. I actually ended up adding far more (the Bhut Jolokia) than what I have shown in the image above (crushed Thai peppers).


By now your microwave should be calling you. Your chocolate is ready.  Pour it over the popcorn, mix well and then add the sugar/chili mix.


Here's what you get. A couple bites in, you should be able to taste the spice. If you don't, you're doing it wrong.
Enjoy!


Thursday, July 19, 2012

Pork Belly Buns


Holy goodness in a palm sized sandwich.  This recipe here takes a handful of my favorite things and slaps it all together into a three (sometimes two) bite devour.  I love pork belly (think bacon) and Vietnamese Thit Kho/Thit Ba Roi, I love steamed buns (think Banh Bao), I love Hoisin sauce, and I love crunchy cucumbers and carrots.


To make this as quick and simple as possible so that I wouldn't have to wait hours to eat it, I grabbed a pack of pre-made buns from the Korean grocery store. Pop those babies in the microwave for 45 seconds and you've got steamed buns.  The longest process, if that, was cooking the meat, which then I had to refrain from eating all of. It was that good and reminded me of moms cooking.  Assembly took a few moments, eating took less. I never made it to the dining table and my five year old, who I usually have to coax to eat, gobbled three of them - which to me means mega success all around.


What You'll Need:
2 pounds of Pork Belly (skinless/boneless) - you can buy it
   pre sliced to size, or cut it yourself into 1/2 " pieces.
3 tbs Sugar 
2 tbs Fish Sauce
1/2 cup of Warm Water
Fine Black Pepper
1/2 Onion - chopped
2 Thai Chilis - chopped
1 Cucumber - sliced
1 Carrot - shredded
Hoisin Sauce
Pre-made Lotus Leaf Steamed Buns (you can make them yourself.. but that borders on too fancy for me).


Directions:
Put the pork belly in a large frying pan and cook over medium/high heat.  I do not use oil because the meat will provide plenty for you. 


Once the meat starts to cook, add the onions (minced garlic too if you want) and give it a few stirs here and then add the sugar and fish sauce.  


When the sugar has dissolved, stir again to coat the meat and then do not stir the meat for awhile to let it caramelize. About 6 mins or so.  


Once this happens, you can add 1/2 cup of water and stir.  At this point turn down the heat to medium and let it simmer. Stir occasionally. 


While the meat is simmering, cut the cucumber slices, and shred the carrots.

Steam the buns in the microwave, approx 45 seconds under a wet paper towel.  You can also use a steamer - instructions are on the package. And yes, I did steal two and eat them.


By now the meat should look like this and you'll want to add some green onions and red chilis to it along with the black pepper. Stir it well.


You could stop at this point and just eat this with rice, and depending on how many buns you end up eating, you may have leftovers to do just that.


Yum yum yum, now its time to assemble and eat!
Squirt a little hoisin sauce on the bottom bun and place a few shreds of carrot over it. Next place a piece of meat followed by a cucumber slice. Thats it!  And awesome little flavorful Bao.


Wednesday, July 18, 2012

Pretzel Honey Mustard Chicken Tenders


This is a really simple and fast meal that I found via DashingDish, that everyone in my home enjoyed.   I had never even considered pretzels as the crust before and with several half eaten bags of pretzels in the house, this was a great way to make room in my pantry. 

You Will Need:
1 lb of Chicken Tenders.
3 tbs of Honey
2 tbs of Mustard
1 cup of finely crushed Pretzels *
Salt, Pepper, Garlic Powder (a couple shakes here and there)

* Its really important to finely crush the pretzels, otherwise they won't stick to the chicken.  I did leave some pieces less crushed for show and just smooshed them on as best as I could. 


Directions:

Preheat the oven to 425 degrees and spray a baking sheet with some non stick cooking spray.

Mix the honey and mustard together. I added some store bought honey mustard I had in the fridge as well, it kind of boosted the flavor (in my mind at least), and thickened it just a little bit more.

Mix the pretzel crumbs with the salt, pepper and garlic powder.

Dip the chicken pieces into the honey mustard mix then the pretzel mix. 


Place on baking sheet and bake for approx 10 minutes. Flip and repeat for another 10 minutes. 


Serve with more honey mustard or whatever you prefer to dip with.

Monday, July 16, 2012

Peanut Butter Cornflake Cookies


In my quest this past Saturday for a simple, no bake cookie recipe, I came across numerous images online of this cornflake cookie. 

I have never heard of a cornflake cookie, but it looked REALLY easy to make and sounded like something my son and his friends would enjoy (and apparently the adults too because by the end of the evening they were all gone!)

First of all, I have to say they were not as easy as I expected. And maybe I did something wrong. Maybe I measured out the ingredients wrong, though I'm sure I didn't....whatever the case, it was nearly impossible to stir for quite some time and then trying to form the cookies was a small feat - not only that, in the end, the results didn't look anything like what I saw online with soft, silky looking peanut butter coating the flakes.  Mine looked more like a lump.  I ended up drizzling melted chocolate across the top to fancy this non fancy up some.

The recipe is pretty basic.
You'll Need:
6 Cups of Cornflakes
1 Cup of Sugar
1 Cup of Corn Syrup 
Jar of Peanut Butter - 18oz
Chocolate to melt, drizzle and fancy
Parchment or Wax Paper

* This amount gave me two full plates of cookies.

Directions:

Place the sugar and syrup in a sauce pan and bring to boil over medium heat.

Remove it from the heat once melted and add the peanut butter.

Stir until its all melted/blended together.

Pour the mixture over the cornflakes and toss them until they are covered.
* here is my issue, it seemed I didn't have enough of this mixture and this contributed to me having a hard time making the cookie lumps.

Spoon onto parchment paper and once its totally cooled you can drizzle some melted chocolate on it.

Eat, Enjoy, Eat Some More.

Sunday, July 15, 2012

Virgin Sangria!

Well the pictures for this post aren't going to be as awesome as this tasted as I was far too busy eating the fruit to even pay attention to the fact that I was doing such a crappy job... the fruit was THAT good!   I mean, look at it!....via my crappy iPhone pictures.. :/   Anyways, so I was having this surprise party for my best pal Wendy and her husband DJ, to celebrate the fact that they have a new baby on the way. Everyones talking beer, wine, vodka gummies and the like- all things my partner in crime cannot partake in now that she's pregnant.  So I'm racking my brain for a tasty virgin summer drink that would totally make her happy and well what better drink than Sangria!  Its easy to make, it tastes amazing, and really, once the citrus soaks in there, with the grape juice and stuff....it kinda tastes like an alcoholic beverage... I think. Sorda.  Wendy was happy. Success!


What You'll Need:
3 Cups Grape Juice
3/4 Cups Apple Juice
1/2 Cup Orange Juice
2 Cups Ginger Ale
1 Lemon - thinly slice, leave on the peel.
1 Lime - thinly slice, leave on the peel.
1 Orange - thinly slice, leave on the peel.
1 Apple - core and cut into chunks.
Grapes - seedless.
Cherries - I leave the stems on for easy grabbing and eating.
Nectarine - remove pit and cut into chunks.
Strawberries - cut in half or leave whole.


Directions:
After washing and cutting the fruit,  combine everything except the ginger ale into a pitcher or two and place in the fridge overnight. You don't have to do this, but its well worth it to have all the flavors mix together and soak into the fruits.
Before serving, add the ginger ale. 


Vodka Gummy Lifesavers

As if the vodka gummy bears weren't delicious enough, I've come to realize over the past weekend that the gummy Lifesavers are even better.  The gummy in these gummies are slightly a different texture... slightly softer but not too much where it all ends up mushy.  With just 5 days to work with, I think any more would have been way too much.


More noticeable is the fact that they attacked almost an entire bottle of vodka in under 24 hours. By the next morning, these gummies had soaked in that vodka much more than the bears did by that time and I had to more than just top off the bowl.  


The recipe is pretty simple. Follow the vodka gummy bear recipe I previously mentioned, and just sub the bears for the Lifesavers.  This time too, I used a raspberry vodka, which enhanced the flavor.  


Here's all you need. Plus some fruit punch in the end.
This is a total of four bags of gummies. 
Two in the bowl, two still bagged. 
I upgraded to a larger bowl after taking this pic and good thing I did, as this would have been a tight fit.


The Lifesavers are soaking and ready to begin the journey.


The morning of Day 2.


Refilling the bowl with more vodka.


And Yum!